- Coding Classes For Kids – How To Create My First Website? – Basic Tutorial
- Coding Classes For Kids – Website File Structure – Basic Tutorial
- Coding Classes For Kids – Website Skeleton – HTML Basic Structure – Basic Tutorial
- Coding Classes For Kids – Website Content – HTML Tags – Basic Tutorial
- Coding Classes For Kids – Styles Introduction – CSS Selectors & Properties – Basic Tutorial
- Coding Classes For Kids – How To Create My First Website? – Wrap Up
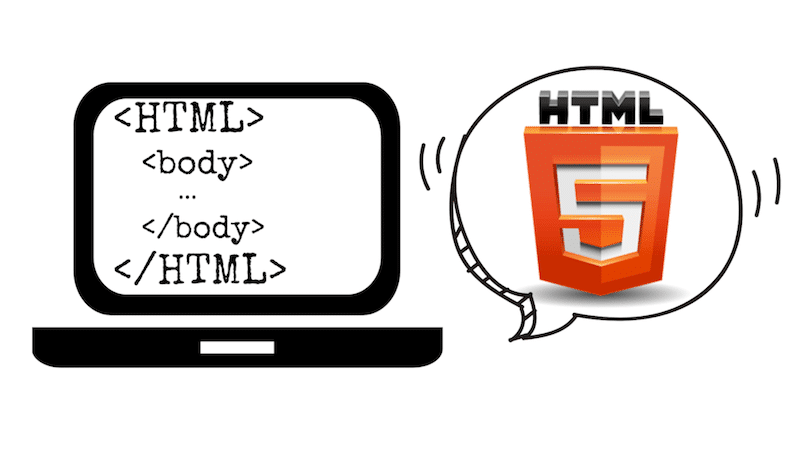
We are finally getting to the point when we will start coding! First of all, we will learn about HTML and the basic structure of our website. We will need to create a skeleton of our page, something similar to the skeleton of our body 🙂 HTML language is a language which will help us to create our skeleton. Let’s start with HTML Basic Structure class.
Remember, if you have any questions during the course, feel free to ask me in the comment section below.
Contents
What is HTML?
In the previous lessons we have mentioned HTML several times but we never explained what that is exactly. HTML means HyperText Markup Language and it is a language that gives structure for our website. This language translates our code to language which is understood by the browser. The browser will read the HTML and display the elements which we want to show.
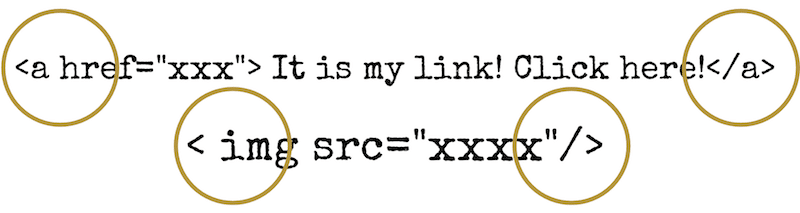
Let me give you an example. When we type ‘It is my link! Click here!’ in our code editor, the browser will NOT know that we want to create a link. That’s the moment when we want to use HTML language. We will use <a> tag in order to tell browser that, ‘It is my link! Click here!’, should be a link and it should redirect us to another page. No worries, we will learn about it later on.
HTML Tags
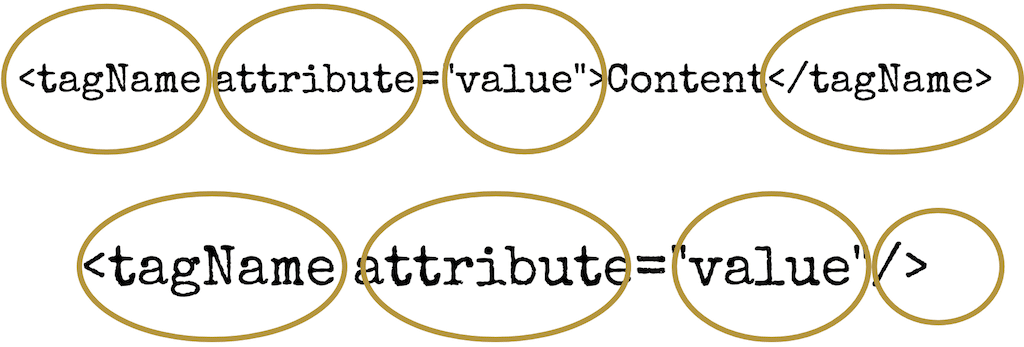
Every language has its own elements or characters. HTML has its own elements as well and we call them tags (</>). We will learn about tags in future lessons but at this point it is important to understand how these tags work. Every tag has a name, it can also have attributes, some tags can be self-closing and some need a closing tag.
 Above I told you about creating links. I will continue with this example. We need to tell the browser using HTML language that we want to create a link. Our code will look something similar to the following:
<a href="xxx">It is my link! Click here!</a> Do you see <a> and </a>? They are tags and they have a specific meaning, in our case, they mean link. Some elements have opening and closing tags. In our case <a> is an opening tag and </a> is a closing tag. Notice, that the opening tag has two angle brackets and the closing tag has additionally a forward slash. In our case <a> tag also has the attribute which is “href” and value which is “xxx“.
Some elements are self-closing that means that the same tag is an opening and closing tag, for example:
<img src="xxxx"/>This tag is used for adding image. Notice, that at the end we have forward slash. This tag also has attributes which are “src” and value which is “xxxx“. No worries, we will talk about it later as well. For now, remember that:
HTML has special tags which have important meaning. Some elements start from an opening tag like < a> and a closing tag like </ a>, some elements are self-closing like < img src=”xxxx”/>. Some tags can have attributes with values assigned to it.
HTML Containers
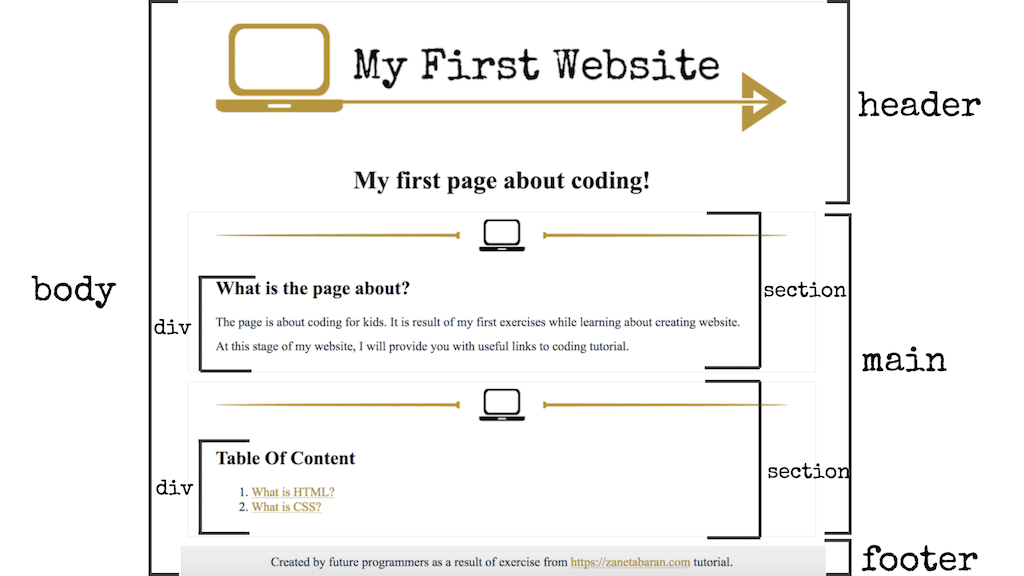
Before we get to the main point, I would like to mention about containers. The structure of every website is based on containers. Containers are created based on certain HTML tags and help to organise our site. Inside of the containers we will add another container and other elements. In order to create the skeleton of our website we will add containers, for example thee head, body, header, main, footer and so on. Continue reading to see what I mean.
HTML Intending
Have you noticed something? On the picture above you can see containers inside other containers. In the examples below we will add the <main> tag inside the <body> tag and so on. However at this point we need to mention the really important part. We will use indentation while writing our code. All elements which are inside another element are indented. We call it proper formatting of the code. We use indentation to make our code clean and tidy. Again we are talking about cleaning but it is really important in coding. Keep reading, it will be more clear soon.

Website Skeleton
Now it is time to create the skeleton of our website. Do you remember the previous lesson, when I was talking about file structure, that time we already created index.html and we will use this file now. Open the file in your code editor.

Before we start coding we need to think about the skeleton for our website. A website’s skeletons have a specific structure. Every website has a head and a body, the same as humans. The body then includes a header and a footer. Let’s start coding and everything will be much more clearer.
HTML – Hey it is website!
First of all, we need to let our browser know that we will write HTML code. In order to do it, we need to add a specific tag at the beginning of our file.
< !DOCTYPE html>Then we need to add
<html>
</html>
Do you remember opening and closing tags? These tags tell a browser that everything what will be between these tags will be the skeleton of our website. At this point in your index.html file you should have:
< !DOCTYPE html>
<html>
</html>
Now, we will add everything between <html> and </html> tags. We will add elements inside another elements.
HEAD – It is a head!
Every website has a head. A head is a special tag which includes a lot of information, for example the title of the website, certain information for a browser or search tool like Google. Thanks to the information in our head, Google knows what our site is about. Head is not visible in the browser, it is hidden and visible only for search engines and server.
Head will also include information about other files of our website. Remember when I told you that index.html is the file where everything starts? In this start file, we will also need to tell the browser that we will include other files. We will learn about it later on.
At this point let’s add the head tag
< !DOCTYPE html>
<html>
   <head>
   </head>
</html>
At this point, let’s add the title of our the page as well. The title will be visible in the browser tab.
< !DOCTYPE html>
<html>
   <head>
      <title> Hey Internet, it is my new website! </title>
   </head>
</html>
The title tag should be added inside of the head tag. Remember about indentation – clean the code! 🙂

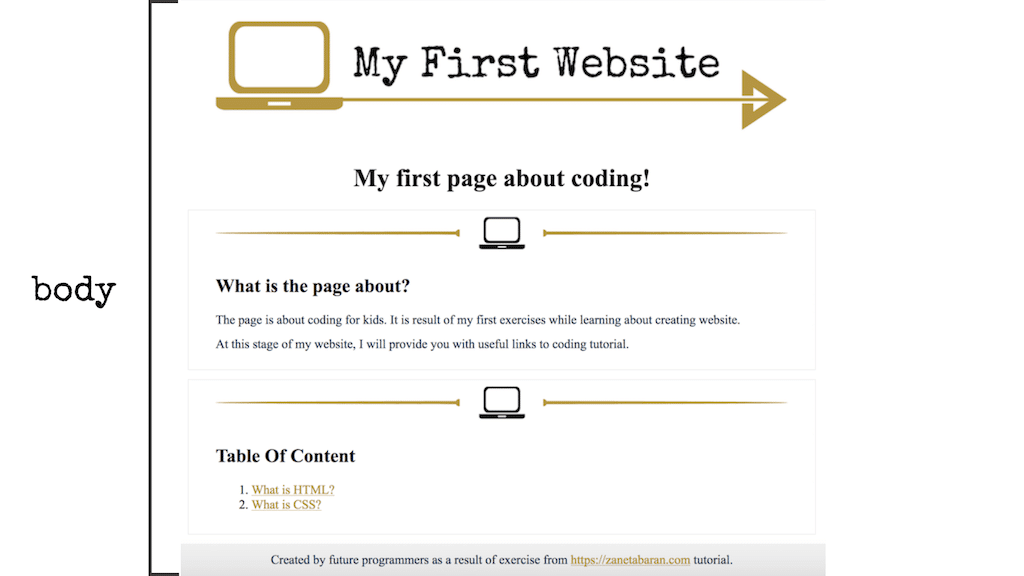
BODY – It is a body!
As I mentioned above, every site has head and body tags. Body tags include all elements which we can see on the site. Body tags say to the browser – Hey, right now I will tell you what you need to show on my website!
< !DOCTYPE html>
<html>
   <head>
      <title> Hey Internet, it is my new website! </title>
   </head>
   <body>
   </body>
</html>
Now, let’s start the funny part! 🙂
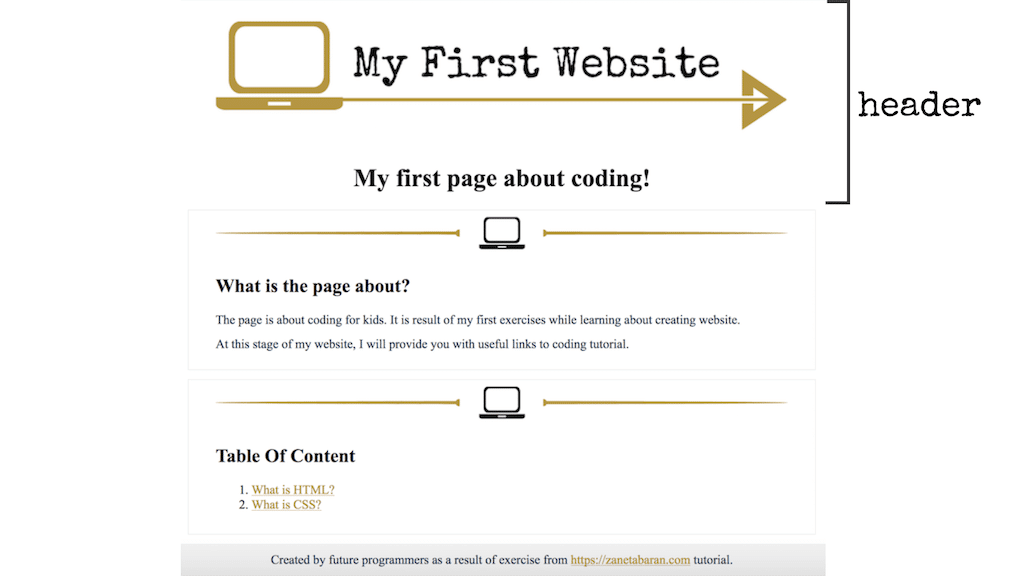
HEADER – Hey, it is a header of my page!
As I mentioned above, right now we will start adding elements which will be shown in the browser. We were talking about the head tag, now we will talk about the header tag. They are not the same tags. Header is located inside of the body tag. The header will contain all of the elements on the top of our page, for example our logo. Let’s prepare a header tag for later.
< !DOCTYPE html>
<html>
   <head>
      <title> Hey Internet, it is my new website! </title>
   </head>
   <body>
      <header>
      </header>
   </body>
</html>
MAIN – Hey, it is a main part of my page!
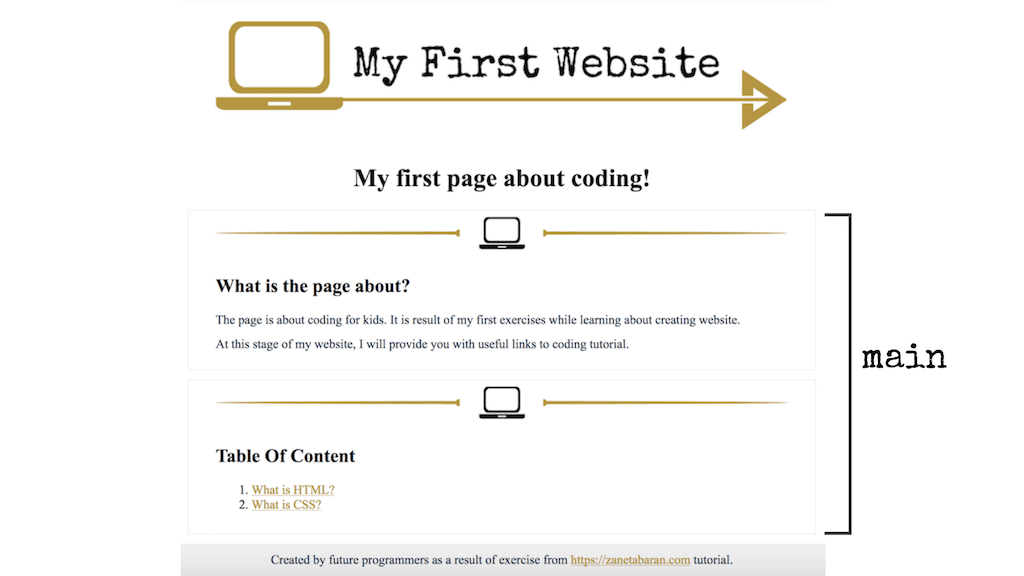
Another tag of our skeleton is main. The Main tag will include the main content of our page. For example a description of our page, links and images will be added to this part. Let’s prepare the main tag then.
< !DOCTYPE html>
<html>
   <head>
      <title> Hey Internet, it is my new website! </title>
   </head>
   <body>
      <header>
      </header>
      <main>
      </main>
   </body>
</html>
FOOTER – Hey, it is a footer of my page!
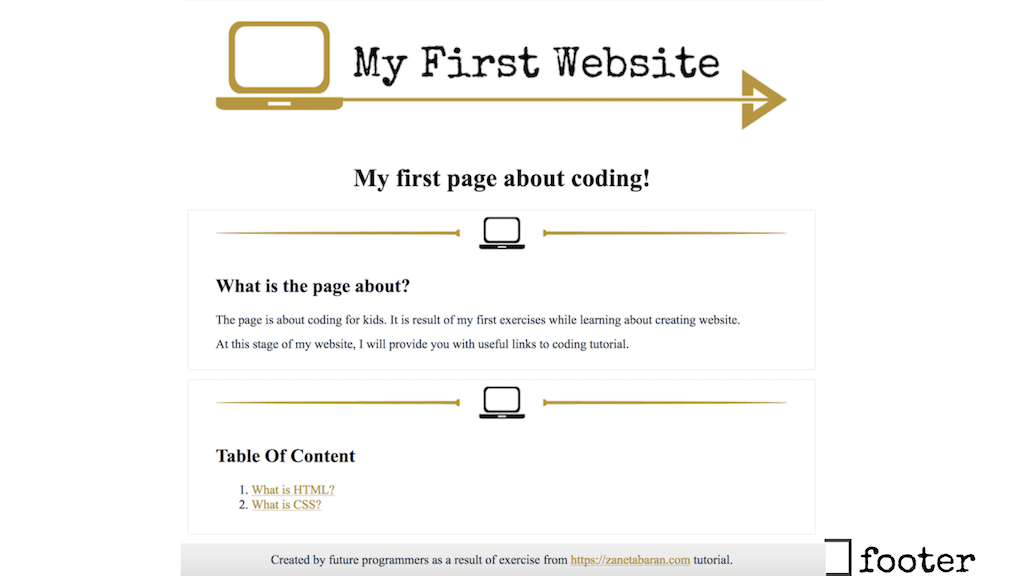
Finally we are at the end. Footer is a tag which includes some additional links, like links to social medias or contact pages or information about the author of the page or address. Remember to not add your private address to the page! Address is only added if the page is about local business. Let’s add footer then!
< !DOCTYPE html>
<html>
   <head>
      <title> Hey Internet, it is my new website! </title>
   </head>
   <body>
      <header>
      </header>
      <main>
      </main>
      <footer>
      </footer>
   </body>
</html>
It is the skeleton of the page! Let’s leave some comments!
Yeah! We just created the skeleton of our page. Make sure that your code looks exactly the same as on our example. It is really easy to forgot to close the tags and this case can cause error on our page and browser will not be able show our website.
At this point I want to show you a trick! HTML has a lot of tags and it is really easy to forget what they mean. Moreover, when we finish this lesson and you will come back here in a couple of weeks, you will probably forget all the code that we wrote. In order to remember what we have implemented, we can use comments. We use them really often in real life when we write the code. Why? For us to remember but also for other developers who can potentially work on our code in the future. Comments will not be visible on our page, they will be only visible in the code. How to add a comment?
<!-- Hey, it is a comment -->Everything that is included between <!– and –> will be a comment, it will not be visible on the page, it will only be visible when you open your code editor with the index.html file. Let’s add some comments then!
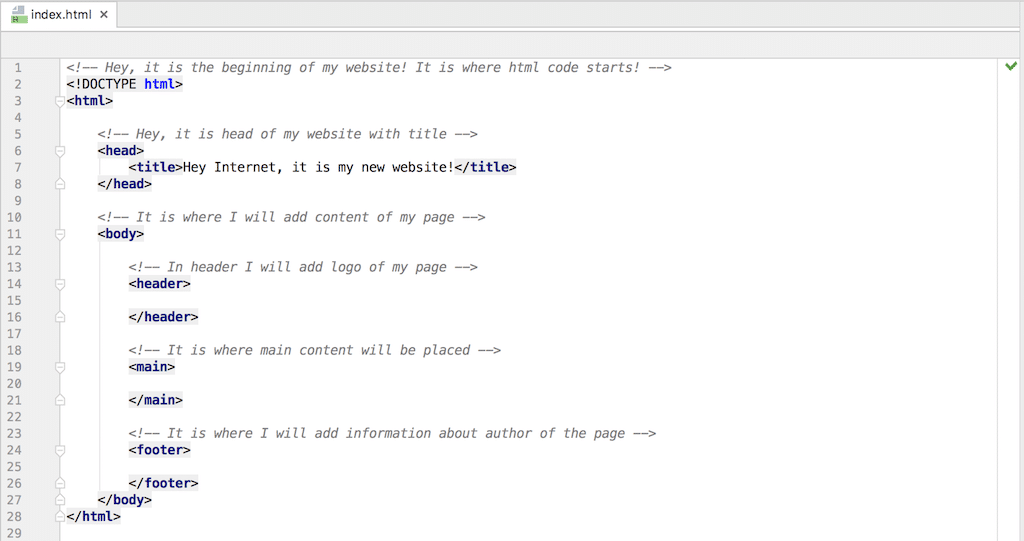
<!-- Hey, it is the beginning of my website! It is where html code starts! -->
< !DOCTYPE html>
<html>
   <!-- Hey, it is head of my website with title -->
   <head>
      <title> Hey Internet, it is my new website! </title>
   </head>
   <!-- It is where I will add the contents of my page -->
   <body>
      <!-- In header I will add logo of my page -->
      <header>
      </header>
      <!-- It is where main content will be placed -->
      <main>
      </main>
      <!-- It is where I will add information about author of the page -->
      <footer>
      </footer>
   </body>
</html>
That’s how your final file should look like:
Next lesson will be about…?
Uff! First coding time done! We have the skeleton of our page, we know where to add certain elements, we know how to format our code and how to add comments. Well done!
In the next lesson we will add content to our page! Ready?
To download packages of files from this lesson – Coding Classes For Kids – Website Skeleton – HTML Basic Structure – Basic Tutorial click Website Html Basic Structure.
Zaneta loves challenges so deciding about career path she has chosen typical male industry. Woman who codes. Every 1-2 years she lives in different part of the world. Gym dates is something what she specialised in. Healthy lifestyle, extreme sports and motorbikes have stolen her hear years ago.