- How To In Magento 2 – How To Start?
- How To In Magento 2 – How To Add Custom Icons?
- How To In Magento 2 – How To Add Modal PopUp?
- How To In Magento 2 – How To Move Checkout Buttons To Order Summary Only On Desktop
- How To In Magento 2 – How To Recognise Shipping And Payment Step In Checkout On Frontend
- How To In Magento 2 – How To Display Shipping Details On Shipping Step In Checkout
- How To In Magento 2 – How To Display Total Price Summary On Shipping Step In Checkout
- How To In Magento 2 – How To Add Tabs (Accordion) Only On Mobile
- How To In Magento 2 – How To Display Additional Text Based On Selected Shipping Methods In The Checkout
- How To In Magento 2 – How To Add Additional Dropdown With Options Based On Selected Shipping Methods In The Checkout
Last time I showed you how to display additional text based on selected shipping method. Today post will be continuation of the previous one. This time we will not only show additional block but we will create select with options which depend on selected shipping method. This case can be used to allow user select day when the products should be delivered to his or her place. Let’s start then.
I am happy to share with you all the necessary code that you will need to add to your project. I will provide you with an example and I will focus on a case where we want to additional dropdown with options based on selected shipping methods in the checkout in Magento 2 project. If you need any help, book with me 1hr Magento 2 Frontend consultation or learn more about starting work with Magento 2!
Contents
How to add additional dropdown with options based on selected shipping methods in the checkout in Magento 2?
Let’s start with the plan of what we need to do in order to add additional dropdown with options based on selected shipping methods in the checkout in Magento 2. Let’s start with the frontend part. First of all we will add html template with the content which will be shown only when one of the shipping method is selected. It will contain our additional dropdown. The second step would be to add our template into shippingAdditional area which is already defined by Magento below shipping methods. In order to do it we need to extend checkout_index_index.xml file. The last step will be to add two javascript files which will help us to decide when to show dropdown and what kind of options it will have. For the backend part we will extend payload with new attribute. In order to do it we will create extension_attributes.xml and paypload-extender-mixin.js in order to extend quote with new attributes.
SUBSCRIBE TO MAGENTO 2 NEWSLETTER!
Would you like to get information when new Magento tutorial is available?
Subscribe to the newsletter and be up to date!
Frontend Part – Showing Options
We will start with frontend part how to show dropdown with options depended on selected shipping methods. As second part of this tutorial, we will talk about sending these datas to backend.
Template
First of all, let’s add the necessary template to our module or theme. They will be located in vendor/vendor-name/module-name/view/frontend/web/template/ or vendor/vendor-name/theme-name/Magento_Checkout/web/template/ where “vendor-name“ and “theme-name” needs to be replaced with your name of vendor and theme. Notice, we are using Magento_Checkout module since changes will be made in this specific section.
additional-shipping-option.html
For the needs of this exercise we will add dropdown with possibility to choose day of delivery.
<div class="additional-shipping-option-wrapper" data-bind="visible: showAdditonalOption()" style="display: none;">
    <div class="step-title" data-role="title" data-bind="i18n: 'Choose day'"></div>
    <!-- ko foreach: element.getRegion('additonalShippingOptionField') -->
    <!-- ko template: getTemplate() --><!-- /ko -->
    <!--/ko-->
</div>
Your HTML structure doesn’t need to be exactly as above. The important part is to add method which we will use in javascript to show the content. I have bolded this part showAdditonalOption(). We are also adding style=”display: none; since initially we don’t want to this block to be visible. Another important part is element.getRegion(‘additonalShippingOptionField’) which define new area which we will refer to in checkout_index_index.xml file. This part will be responsible to show all content defined in the xml file under this area, which in our case means select. Feel free to change rest of the code, just keep foreach loop as it is:
    <!-- ko foreach: element.getRegion('additonalShippingOptionField') -->
    <!-- ko template: getTemplate() --><!-- /ko -->
    <!--/ko-->
Layout
At this point we will add code to checkout_index_index.xml so we can add additional block below shipping methods.
checkout_index_index.ml
If you are using module, you need to add file into following path vendor/vendor-name/module-name/view/frontend/layout/ or for theme vendor/vendor-name/theme-name/Magento_Checkout/layout/ where “vendor-name“ and “theme-name” needs to be replaced with your name of vendor and theme. Again, notice, we are using Magento_Checkout module since changes will be made in this specific section.
<?xml version="1.0"?>
<page layout="1column" xmlns:xsi="http://www.w3.org/2001/XMLSchema-instance"
      xsi:noNamespaceSchemaLocation="urn:magento:framework:View/Layout/etc/page_configuration.xsd">
    <body>
        <referenceBlock name="checkout.root">
            <arguments>
                <argument name="jsLayout" xsi:type="array">
                    <item name="components" xsi:type="array">
                        <item name="checkout" xsi:type="array">
                            <item name="children" xsi:type="array">
                                <item name="steps" xsi:type="array">
                                    <item name="children" xsi:type="array">
                                        <item name="shipping-step" xsi:type="array">
                                            <item name="children" xsi:type="array">
                                                <item name="shippingAddress" xsi:type="array">
                                                    <item name="children" xsi:type="array">
                                                        <item name="shippingAdditional" xsi:type="array">
                                                            <item name="component" xsi:type="string">uiComponent</item>
                                                            <item name="displayArea" xsi:type="string">shippingAdditional</item>
                                                            <item name="children" xsi:type="array">
                                                                <item name="shipping-option-wrapper" xsi:type="array">
                                                                    <!-- Component Magento_Checkout/js/view/additional-shipping-option is used as a wrapper for content -->
                                                                    <item name="component" xsi:type="string">Magento_Checkout/js/view/additional-shipping-option</item>
                                                                    <item name="provider" xsi:type="string">checkoutProvider</item>
                                                                    <item name="sortOrder" xsi:type="string">0</item>
                                                                    <item name="children" xsi:type="array">
                                                                        <item name="shipping-option" xsi:type="array">
                                                                            <!-- uiComponent is used as a wrapper for select (its template will render all children as a list) -->
                                                                            <item name="component" xsi:type="string">uiComponent</item>
                                                                            <!-- the following display area is used in template -->
                                                                            <item name="displayArea" xsi:type="string">additionalShippingOptionField</item>
                                                                            <item name="children" xsi:type="array">
                                                                                <item name="select-date" xsi:type="array">
                                                                                    <item name="component" xsi:type="string">Magento_Checkout/js/view/shipping-option-select</item>
                                                                                    <item name="config" xsi:type="array">
                                                                                        <!--customScope is used to group elements within a single form (e.g. they can be validated separately)-->
                                                                                        <item name="customScope" xsi:type="string">shippingOptionSelect</item>
                                                                                        <item name="template" xsi:type="string">ui/form/field</item>
                                                                                        <item name="elementTmpl" xsi:type="string">ui/form/element/select</item>
                                                                                    </item>
                                                                                    <item name="dataScope" xsi:type="string">shippingOptionSelect.select_data</item>
                                                                                    <item name="label" xsi:type="string" translate="true">Please select a day of delivery</item>
                                                                                    <item name="provider" xsi:type="string">checkoutProvider</item>
                                                                                    <item name="visible" xsi:type="boolean">true</item>
                                                                                    <item name="validation" xsi:type="array">
                                                                                        <item name="required-entry" xsi:type="boolean">true</item>
                                                                                        <item name="validate-no-empty" xsi:type="boolean">true</item>
                                                                                    </item>
                                                                                    <item name="sortOrder" xsi:type="number">0</item>
                                                                                </item>
                                                                            </item>
                                                                        </item>
                                                                    </item>
                                                                </item>
                                                            </item>
                                                        </item>
                                                    </item>
                                                </item>
                                            </item>
                                        </item>
                                    </item>
                                </item>
                            </item>
                        </item>
                    </item>
                </argument>
            </arguments>
        </referenceBlock>
    </body>
</page>
Let’s talk a little bit more about this file so we can understand each of these parts. However before we move forward, I would like to encourage you to check Magento 2 documentation – add a new input form to checkout. It describes step by step how to add additional field into checkout.
shippingAdditional
is reference to area below shipping methods already defined by Magento. So basically we tell Magento to add our content into this area. This name should be exactly the same, you shouldn’t change it.
Then we create
shipping-option-wrapper
(this name can be changed to whatever you prefer) which is linked to our custom component
Magento_Checkout/js/view/additional-shipping-option
It is a path to your javascript file. Notice, we skip middle part view/frontend/web/ since Magento automatically will recognise this part of the path. If you are using module, replace Magento_Checkout with name of your module. The javascript file will help us to show or hide content depends if the shipping methods are selected or not.
Then we create new wrapper
shipping-option
This name can be changed to whatever you prefer. This wrapper is linked to new area
additonalShippingOptionField
which we mentioned in html file. That means that whatever is inside this area will be display in our foreach loop in the html file. The name should be exactly the same as you use in html file.
The next step is to create
select-date
element which will be linked to
Magento_Checkout/js/view/shipping-option-select
component which extends standard Magento select component. It will help us with manipulation of select options which depends on selected shipping method. Again, notice, we skip middle part view/frontend/web/ since Magento automatically will recognise this part of the path. If you are using module, replace Magento_Checkout with name of your module.
shippingOptionSelect
is custom scope which group our elements, in case we have more than one field.
shippingOptionSelect.select_data
defined our new select which name is select_data within custom scope shippingOptionSelect.
Javascript
The two files which we will be adding are additinal-shipping-option.js which is our template for the whole new block and shipping-option-select.js which is our template for dropdown itself.
additional-shipping-option.js
If you are using module, you need to add file into following path vendor/vendor-name/module-name/view/frontend/web/js/view/ or for theme vendor/vendor-name/theme-name/Magento_Checkout/web/js/view/ where “vendor-name“ and “theme-name” needs to be replaced with your name of vendor and theme. Notice, in js folder I have created view folder, it is not necessary, you could place file directly under js directory however since this file helps us with the view of the functionality, I have created this additional folder to make it clear for future development.
;define([
    'uiComponent',
    'ko',
    'Magento_Checkout/js/model/quote'

], function (Component, ko, quote) {
    'use strict';

    return Component.extend({
        defaults: {
            template: 'Magento_Checkout/additional-shipping-option'
        },

        initObservable: function () {
            var self = this._super();

            this.showAdditionalOption = ko.computed(function() {
                var method = quote.shippingMethod();

                if(method && method['carrier_code'] !== undefined) {
                    return true;
                }

                return false;

            }, this);

            return this;
        }
    });
});
Let’s analyse this code to understand what each part means. I also really often struggle to understand which part of the code or names I can change for my custom ones and which I need to keep as an example, all of it I will try to explain right now.
'uiComponent',
'ko',
'Magento_Checkout/js/model/quote'
We need to add references to a couple of functions and components to be able to use in our custom code. For example, quote will help us to define selected shipping method.
Component, ko, quote
This part includes aliases to the mentioned above references, you can use here any other names, but in this specific order.
defaults: {
   template: 'Magento_Checkout/additional-shipping-option'
},
It is a part where we decide path to our html file. Notice, we skip middle part, so we just add name of the module and name of the file. If you are using module, replace Magento_Checkout with the name of your module.
initObservable
This method allows you to declare observable variables within the same instance. You can read more about it in Magento 2 documentation – commonly used uiElement methods.
var self = this._super();
returns our original component which we extend.
this.showAdditionalOption = ko.computed(function() {
    var method = quote.shippingMethod();

    if(method && method['carrier_code'] !== undefined) {
        if(method['carrier_code'] === 'freeshipping') {
            return true;
        }
    }

    return false;

}, this);
The bolded part is the name of the method which we are using in html file to show or hide certain text. Make sure it is the same name as used in html file.
if(method && method['carrier_code'] !== undefined) {
    if(method['carrier_code'] === 'freeshipping') {
        return true;
    }
}

return false;
At this part we check if any shipping methods is selected and if it is free shipping, if so, we return true to show certain part. In other case, we return false to not showing the block. The same apply for another shipping method. At this point you can freely play with these conditions, show or hide blocks based on your own preferences.
shipping-option-select.js
If you are using module, you need to add file into following path vendor/vendor-name/module-name/view/frontend/web/js/view/ or for theme vendor/vendor-name/theme-name/Magento_Checkout/web/js/view/ where “vendor-name“ and “theme-name” needs to be replaced with your name of vendor and theme. Notice, in js folder I have created view folder, it is not necessary, you could place file directly under js directory however since this file helps us with the view of the functionality, I have created this additional folder to make it clear for future development.
;define([
    'jquery',
    'ko',
    'Magento_Ui/js/form/element/select',
    'Magento_Checkout/js/model/quote'
], function ($, ko, select, quote) {
    'use strict';

    var self;

    return select.extend({

        initialize: function () {
            self = this;
            this._super();
            this.selectedShippingMethod = quote.shippingMethod();

            quote.shippingMethod.subscribe(function(){

                var method = quote.shippingMethod();

                if(method && method['carrier_code'] !== undefined) {
                    if(!self.selectedShippingMethod || (self.selectedShippingMethod && self.selectedShippingMethod['carrier_code'] != method['carrier_code'])) {
                        self.selectedShippingMethod = method;
                        self.updateDropdownValues(method);
                    }
                }

            }, null, 'change');
        },

        /**
         * Called when shipping method is changed.
         * Also called when initial selection is made.
         *
         * @param value
         * @returns {Object} Chainable
         */
        updateDropdownValues: function(method) {
            var valuesCollection = [];

            if(method['carrier_code'] == 'freeshipping'){
                valuesCollection = [
                    {
                        label: 'Monday',
                        value: 'Monday'
                    },
                    {
                        label: 'Wednesday',
                        value: 'Wednesday'
                    },
                    {
                        label: 'Friday',
                        value: 'Friday'
                    }
                ];
            } else {
                valuesCollection = [
                    {
                        label: 'Today',
                        value: 'Today'
                    },
                    {
                        label: 'Tomorrow',
                        value: 'Tomorrow'
                    }
                ];
            }

            self.updateDropdown(valuesCollection);
        },

        /**
         * Called when option is changed in store selection list.
         * Also called when initial selection is made.
         *
         * @param value
         * @returns {Object} Chainable
         */
        updateDropdown: function(value) {
            this.setOptions(value);
        }
    });
});
Let’s analyse this code to understand what each part means.
'uiComponent',
'ko',
'Magento_Ui/js/form/element/select',
'Magento_Checkout/js/model/quote'
We need to add references to a couple of functions and components to be able to use in our custom code. For example, quote will help us to define selected shipping method and select will refer to default Magento select UI component.
Component, ko, select, quote
This part includes aliases to the mentioned above references, you can use here any other names, but in this specific order.
select.extend
At this point we start extending Magento default select.
this._super();
This part helps us to return whatever default Magento select returns.
this.selectedShippingMethod = quote.shippingMethod();
At this point I am creating variable which will help me to define if the shipping method has been changed. For now I am assigning it whatever is in shipping methods quote.
quote.shippingMethod.subscribe
This part of the code help us to observer selected shipping method via quote, so whenever user choose shipping method, this part is executed. However this part is also executed when user click Next button on the shipping step. That’s why I have created variable this.selectedShippingMethod to be able define if the the shipping method has been changed in fact or the code was executed because user clicked Next button.
if(method && method['carrier_code'] !== undefined) {
    if(!self.selectedShippingMethod || (self.selectedShippingMethod && self.selectedShippingMethod['carrier_code'] != method['carrier_code'])) {
        self.selectedShippingMethod = method;
        self.updateDropdownValues(method);
    }
}
At this point I am checking if any shipping method is selected, if so, I am checking if my variable self.selectedShippingMethod is null or if it has assigned different shipping method as current selected one. If it is true, I am assigning current selected shipping method into my variable and I am executing self.updateDropdownValues(method) method to update options.
updateDropdownValues
Now let’s talk about updateDropdownValues method.
var valuesCollection = [];
I am creating new variable for array options for our select.
if(method['carrier_code'] == 'freeshipping'){
    valuesCollection = [
        {
            label: 'Monday',
            value: 'Monday'
        },
        {
            label: 'Wednesday',
            value: 'Wednesday'
        },
        {
            label: 'Friday',
            value: 'Friday'
        }
    ];
} else {
    valuesCollection = [
        {
            label: 'Today',
            value: 'Today'
        },
        {
            label: 'Tomorrow',
            value: 'Tomorrow'
        }
    ];
}
At this point we populate array with certain options for free shipping and another options for rest of the shipping methods.
self.updateDropdown(valuesCollection);
Here we execute updateDropdown method with certain options which is defined just below.
updateDropdown: function(value) {
    this.setOptions(value);
}
setOption is already Magento default method for select.
Backend Part – Sending Datas
Finally we reached second part of the task. I will not go deeper into backend part since I am not BE developer but I will show you what is necessary to provide datas for backend part. Before moving forward, feel free to check out Magento 2 documentation add a new field in address form, which doesn’t show exactly the same case but overview is similar.
Extension Attribute
We will use extension attribute concept to save data into quote table.
extension_attributes.xml
If you are using general module, you need to add file into following path vendor/vendor-name/module-name/etc/ or for project module app/code/vendor-name/module-name/etc/ where “vendor-name“ and “module-name” needs to be replaced with your name of vendor and project module.
<?xml version="1.0" encoding="UTF-8"?>
<config xmlns:xsi="http://www.w3.org/2001/XMLSchema-instance" xsi:noNamespaceSchemaLocation="urn:magento:framework:Api/etc/extension_attributes.xsd">
    <extension_attributes for="Magento\Checkout\Api\Data\ShippingInformationInterface">
        <attribute code="shipping_date" type="string" />
    </extension_attributes>
</config>
Since we are adding attributes into shipping-information, we need to create attribute extensions for Magento\Checkout\Api\Data\ShippingInformationInterface. Notice, we will use shipping_date code in our new file below.
Javascript
At this point we will extend payload with our new attribute. In order to do it, we need to create two files payload-extender-mixin.js which will help us to extened payload and requirejs-config.js to add the file as mixin.
payload-extender-mixin.js
If you are using module, you need to add file into following path vendor/vendor-name/module-name/view/frontend/web/js/model/shipping-save-processor/ or for theme vendor/vendor-name/theme-name/Magento_Checkout/web/js/model/shipping-save-processor/ where “vendor-name“ and “theme-name” needs to be replaced with your name of vendor and theme. Notice, in js folder I have created model and shipping-save-processor folders, it is not necessary, you could place file directly under js directory however since we are extending payload-extender, it is good to replicate folder structure of the original file. Again, notice, we are using Magento_Checkout module since changes will be made in this specific section but you could also add these files directly vendor/vendor-name/theme-name/web/js/model/shipping-save-processor/ and it is alright as well.
;define([
    'jquery',
    'mage/utils/wrapper',
    'underscore'
], function ($, wrapper, _) {
    'use strict';

    return function (payloadExtender) {
        return wrapper.wrap(payloadExtender, function (originalFunction, payload) {
            var shippingDateValue = $('[name="shipping_date"]') ? $('[name="shipping_date"]').val() : '';

            payload = originalFunction(payload);

            _.extend(payload.addressInformation, {
                extension_attributes: {
                    'shipping_date': shippingDateValue
                }
            });

            return payload;
        });
    };
});
As usual, let’s discuss parts of the code.
'jquery',
'mage/utils/wrapper',
'underscore'
We need jquery for finding elements, wrapper for wrapping original function of payloadExtender and underscore for extend.
$, wrapper, _
This part includes aliases to the mentioned above references, you can use here any other names, but in this specific order.
var shippingDateValue = $('[name="shipping_date"]') ? $('[name="shipping_date"]').val() : '';Over here we are finding our new select based on its name and assigned the value of it into variable. Remember that shipping_date is the name which you have defined in checkout_index_index.xml.
payload = originalFunction(payload);
In this part we are assigning value of original function into payload variable.
_.extend(payload.addressInformation, {
    extension_attributes: {
        'shipping_date': shippingDateValue
    }
});
In this part we are extending payload and adding shipping_date variable into extenion_attributes. New custom attributes should be added into extension_attributes array.
requirejs-config.js
If you are using module, you need to add file into following path vendor/vendor-name/module-name/view/frontend/ or for theme vendor/vendor-name/theme-name/Magento_Checkout/ where “vendor-name“ and “theme-name” needs to be replaced with your name of vendor and theme. Again, notice, we are using Magento_Checkout module since changes will be made in this specific section but you could also add these files directly vendor/vendor-name/theme-name/ and it is alright as well. Whatever option you choose for the file above, you need to stick to this choice while creating this file.
var config = {
    config: {
        mixins: {
            'Magento_Checkout/js/model/shipping-save-processor/payload-extender': {
                'Magento_Checkout/js/model/shipping-save-processor/payload-extender-mixin': true
            }
        }
    }
};
Using this code we basically adding mixins for Magento_Checkout/js/model/shipping-save-processor/payload-extender.
Result of the sending datas into backend part
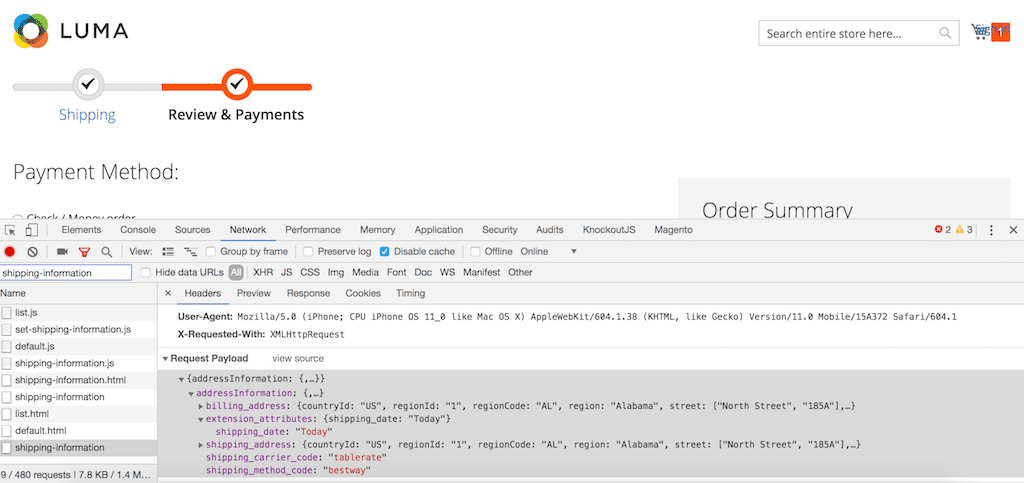
Before moving from shipping step into payment step, open Developer tools. Move to payment step and find shipping-information in Network tab. When you click shipping-information and open Headers tab and move to Request Payload you will be able to see our new attribute.
The extension attributes with our shipping_date are available in address information payload and can be saved in quote table. As I have mentioned, I am not BE developer so I will not pretend that I can teach you how to implement BE part but at least at this moment you are able to access our additional attribute via quote. If you would like to contribute to this article and provide BE part, please reach out to me!
Results
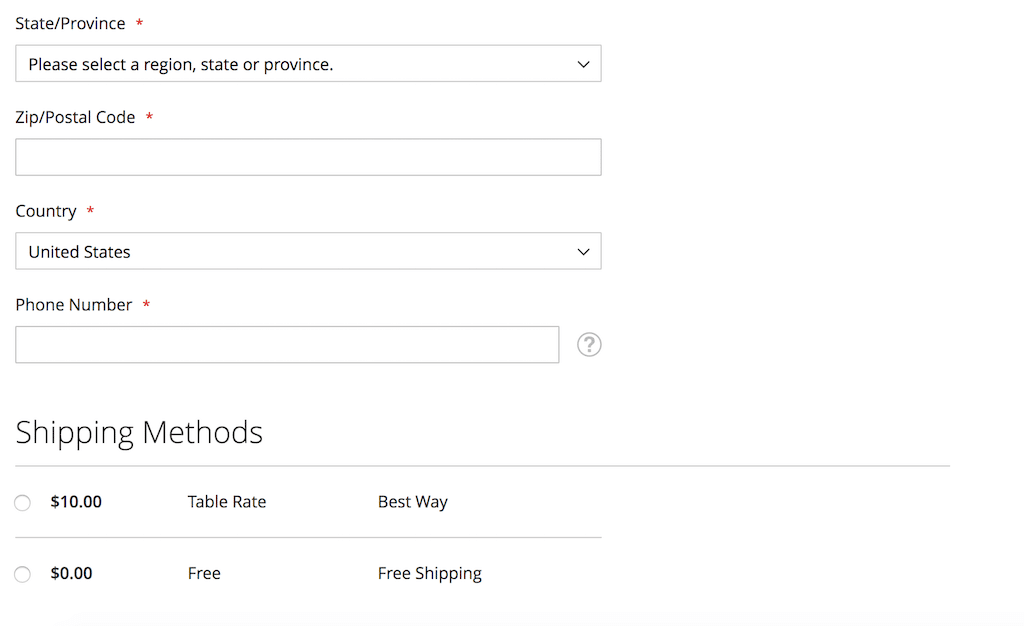
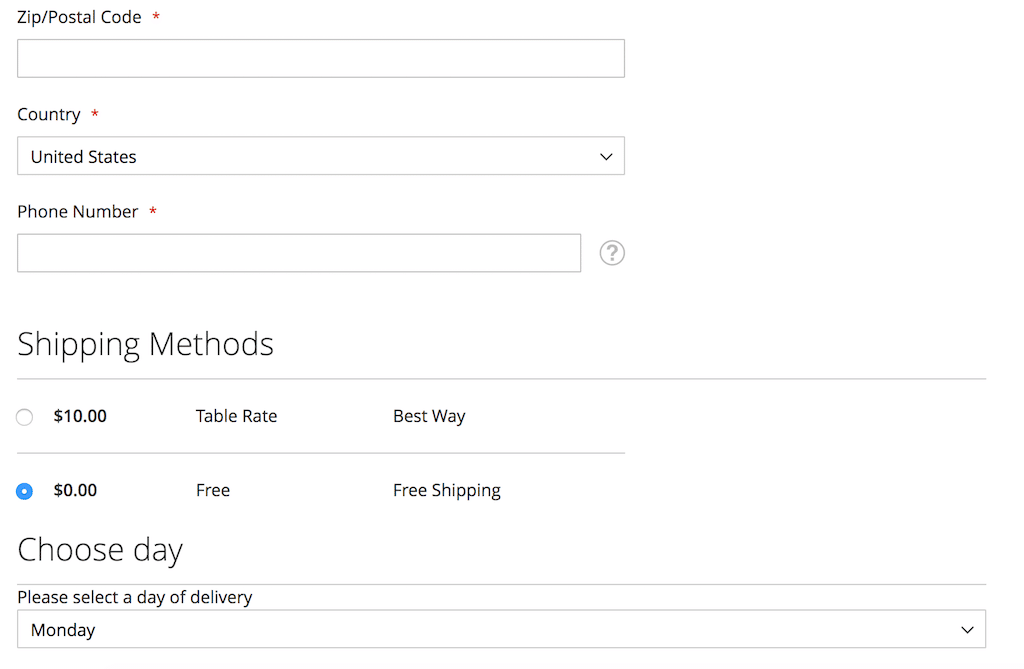
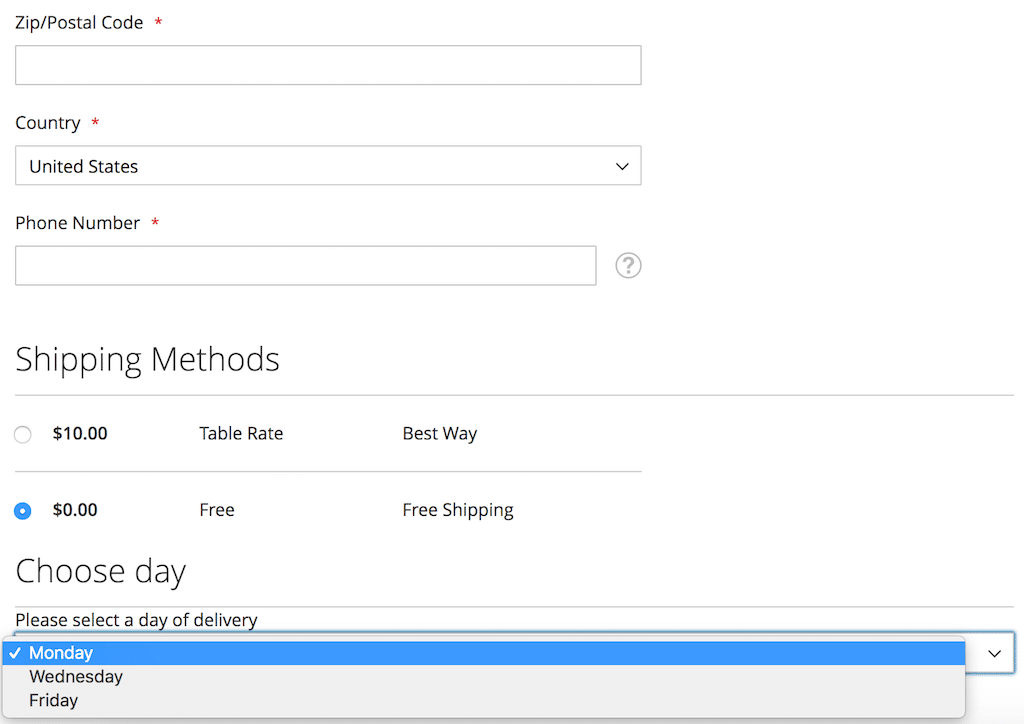
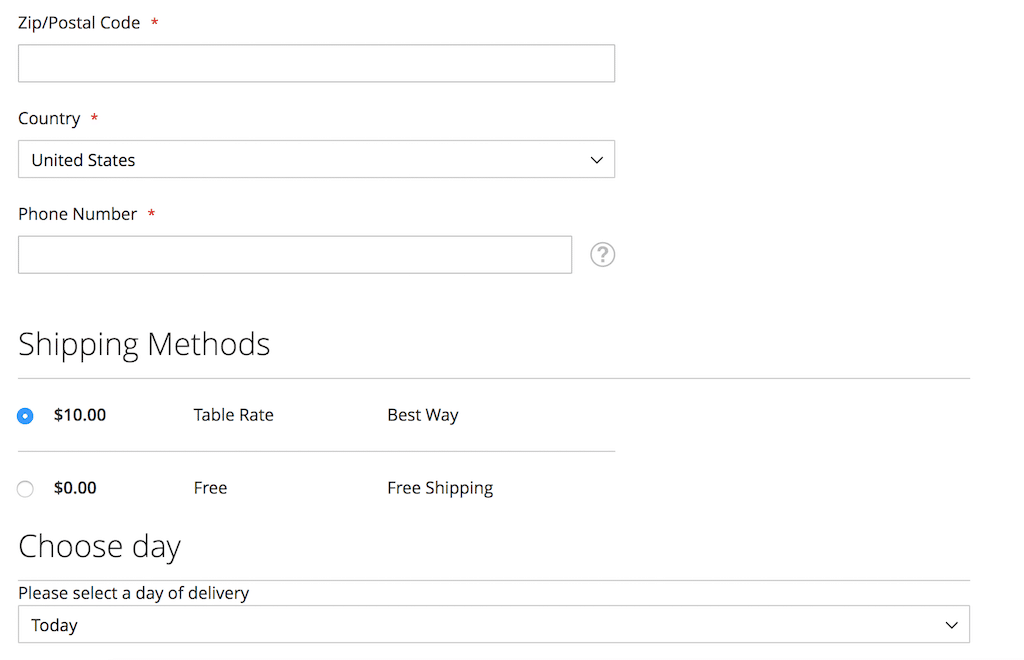
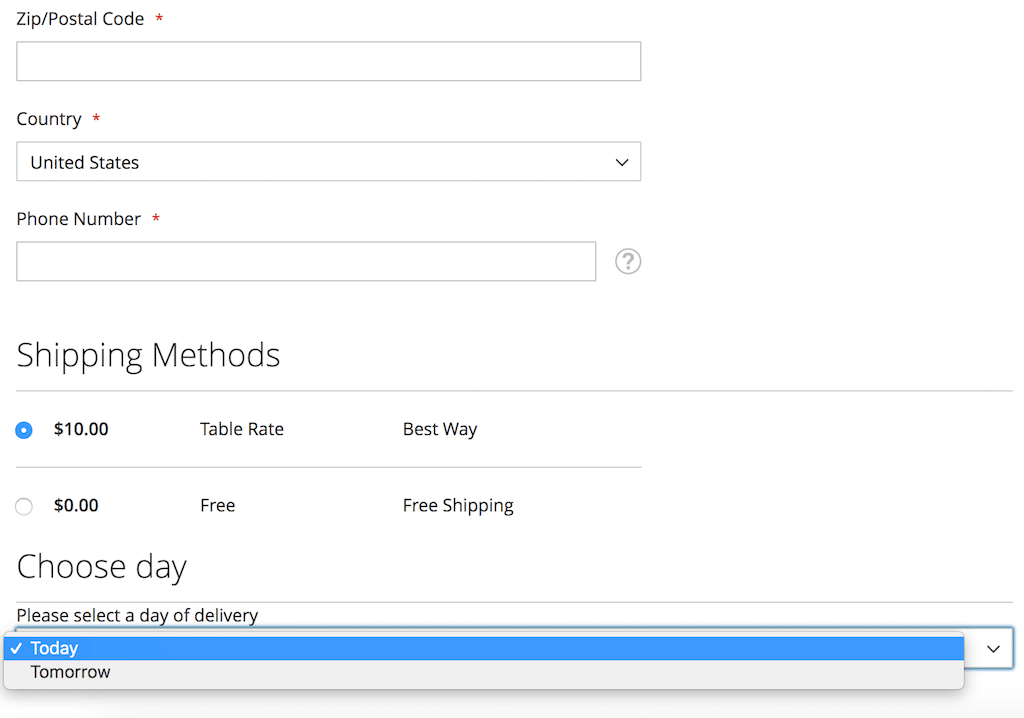
I took for you some screenshots of our implementations based on the Luma theme. I have not added any styling so this is how it will be displayed by default. As you can see I have added additional dropdown with options based on selected shipping methods in the checkout in Magento 2.
Not selected shipping methods
Free shipping method selected
Dropdown options
Table rate shipping method selected
Dropdown options
MORE MAGENTO 2 TUTORIALS
JOIN THE GROUP ON FACEBOOK!
PIN ME!
I hope it can help with your journey with M2! Also, feel free to give your feedback and advice. In case I made a mistake, let me know! I am only human being
Did you find this post useful? I would be more than happy if you share it with your friends, maybe someone else will find it useful as well. Good luck!
Editor – Natasha Jay O’Neil, please contact Natasha directly for queries related to her services.
Zaneta loves challenges so deciding about career path she has chosen typical male industry. Woman who codes. Every 1-2 years she lives in different part of the world. Gym dates is something what she specialised in. Healthy lifestyle, extreme sports and motorbikes have stolen her hear years ago.







10 Comments
Hi,
Do you have the files of a working module? I have tried to create a module following basic guidelines for creating a module and I cannot get anything to work.
Thanks!
Hi,
Unfortunately I don’t have them now. I am on the moving stage so I cannot help at the moment.
If you will still need them in a few days, then I am happy to find them and send it to you 🙂
Thanks,
Zaneta
Hi Zaneta,
Thanks so much for responding!
I am trying to add a dropdown of addresses and a couple of input fields that area available when the user selects a particular shipping method. This way they can choose an address for the shipper and enter a building and unit number. I also need that information pass through to the order. Ideally I’d like to have the addresses set in the admin but one thing at a time. I have been working on it for a few days and thought what you had may help me solve my problem. So far I haven’t been able to get it to work. If you have the files and time that would be great. I am just stuck at the moment.
Thanks again!
Alan
Cześć, czy ja też mógłbym prosić o przesłanie? próbuję, ale coś nie wychodzi…
Pozdrawiam Serdecznie
Hi,
I was able to get the fields to appear at checkout and save the data to the database. I am trying to get the data now to appear in the admin. Any thoughts or direction? I have the code here:
https://magento.stackexchange.com/questions/283830/magento-2-how-to-get-data-saved-in-db-from-custom-checkout-field-to-appear-in
Thanks for the help!
Alan
Missed second “i” in the word “additional”.
If you got troubles – check this
Do you have the files of this module?I followed guide but nothing appear
Thanks.
Hi Zaneta,
First of all thank you for such a nice post.
After implementing your code, I found some mistakes in your code, please correct that
1) In additional-shipping-option.html file there are spelling mistakes.
please update these lines:
Mistake 1:
=============
Your code:
Code should be:
Note: in above code spelling mistake with: showAdditonalOption()
Mistake 2:
=============
Your code:
Code should be:
Note: in above code spelling mistake with: additonalShippingOptionField()
2) In checkout_index_index.xml file, you have given these (additional-shipping-option.js & shipping-option-select.js) files path of default magento checkout module instead of custom module path.
if you are dealing with module, so path should be from your module directory.
at line no. 22:
replace this line: Magento_Checkout/js/view/additional-shipping-option
with: Vendor_Module/js/view/additional-shipping-option
at line no. 33:
replace this line: Magento_Checkout/js/view/shipping-option-select
with: Vendor_Module/js/view/shipping-option-select
3) In additional-shipping-option.js file, you have given the wrong template path.
if you are dealing with module, so path should be from your module directory.
replace below lines:
defaults: {
template: ‘Magento_Checkout/additional-shipping-option’
}
with
defaults: {
template: ‘Vendor_Module/additional-shipping-option’
}
4) In requirejs-config.js file, you have also given the path from the default mogento checkout module at the time of overriding the core payload-extender.js file. The overrided js file path should be from custom module directory.
replace below code:
var config = {
config: {
mixins: {
‘Magento_Checkout/js/model/shipping-save-processor/payload-extender’: {
‘Magento_Checkout/js/model/shipping-save-processor/payload-extender-mixin’: true
}
}
}
};
with
var config = {
config: {
mixins: {
‘Magento_Checkout/js/model/shipping-save-processor/payload-extender’: {
‘Vendor_Module/js/model/shipping-save-processor/payload-extender-mixin’: true
}
}
}
};
After fixing these errors, I implemented this functionality successfully in my project.
Thanks again!
Faisal
hi
i have implement your code in own project it is working fine but there is a
problem when i tried to save data into the database.
how can i save data into the database and which table please provide me
a BE solutions
hii
please provide me a BE solution if you get from any person because i am stuck on BE part