

- How To In Magento 2 – How To Start?
- How To In Magento 2 – How To Add Custom Icons?
- How To In Magento 2 – How To Add Modal PopUp?
- How To In Magento 2 – How To Move Checkout Buttons To Order Summary Only On Desktop
- How To In Magento 2 – How To Recognise Shipping And Payment Step In Checkout On Frontend
- How To In Magento 2 – How To Display Shipping Details On Shipping Step In Checkout
- How To In Magento 2 – How To Display Total Price Summary On Shipping Step In Checkout
- How To In Magento 2 – How To Add Tabs (Accordion) Only On Mobile
- How To In Magento 2 – How To Display Additional Text Based On Selected Shipping Methods In The Checkout
- How To In Magento 2 – How To Add Additional Dropdown With Options Based On Selected Shipping Methods In The Checkout
Since I have been searching Internet to find solution for one of my tasks and I couldn’t find easy tutorial I decided to share with you solution for displaying additional text in the shipping section which depends on selected shipping method. You can play around with this solution to add additional conditions and text. With this tutorial I will only give you an example. Feel free to share another solutions for this issue in the comments.
I am happy to share with you all the necessary code that you will need to add to your project. I will provide you with an example and I will focus on a case where we want to display additional text based on selected shipping methods in the checkout in Magento 2 project. If you need any help, book with me 1hr Magento 2 Frontend consultation or learn more about starting work with Magento 2!

Contents
How to display additional text based on selected shipping methods in the checkout in Magento 2?
Let’s start with the plan of what we need to do in order to display additional text based on selected shipping methods in the checkout in Magento 2. First of all we will create and add additional html template with our custom text into shippingAdditional area which is already defined by Magento below shipping methods. In order to do it we need to add additional code into checkout_index_index.xml file. The last step will be to add javascript file which will help us to decide what text we should display based on selected shipping method. Let’s start then.
SUBSCRIBE TO MAGENTO 2 NEWSLETTER!
Would you like to get information when new Magento tutorial is available?
Subscribe to the newsletter and be up to date!
Template
First of all, let’s add the necessary html template to our module or theme. It will be located in vendor/vendor-name/module-name/view/frontend/web/template/ or vendor/vendor-name/theme-name/Magento_Checkout/web/template/ where “vendor-name“ and “theme-name” needs to be replaced with your name of vendor and theme. Notice, we are using Magento_Checkout module since changes will be made in this specific section.
shipping-info.html
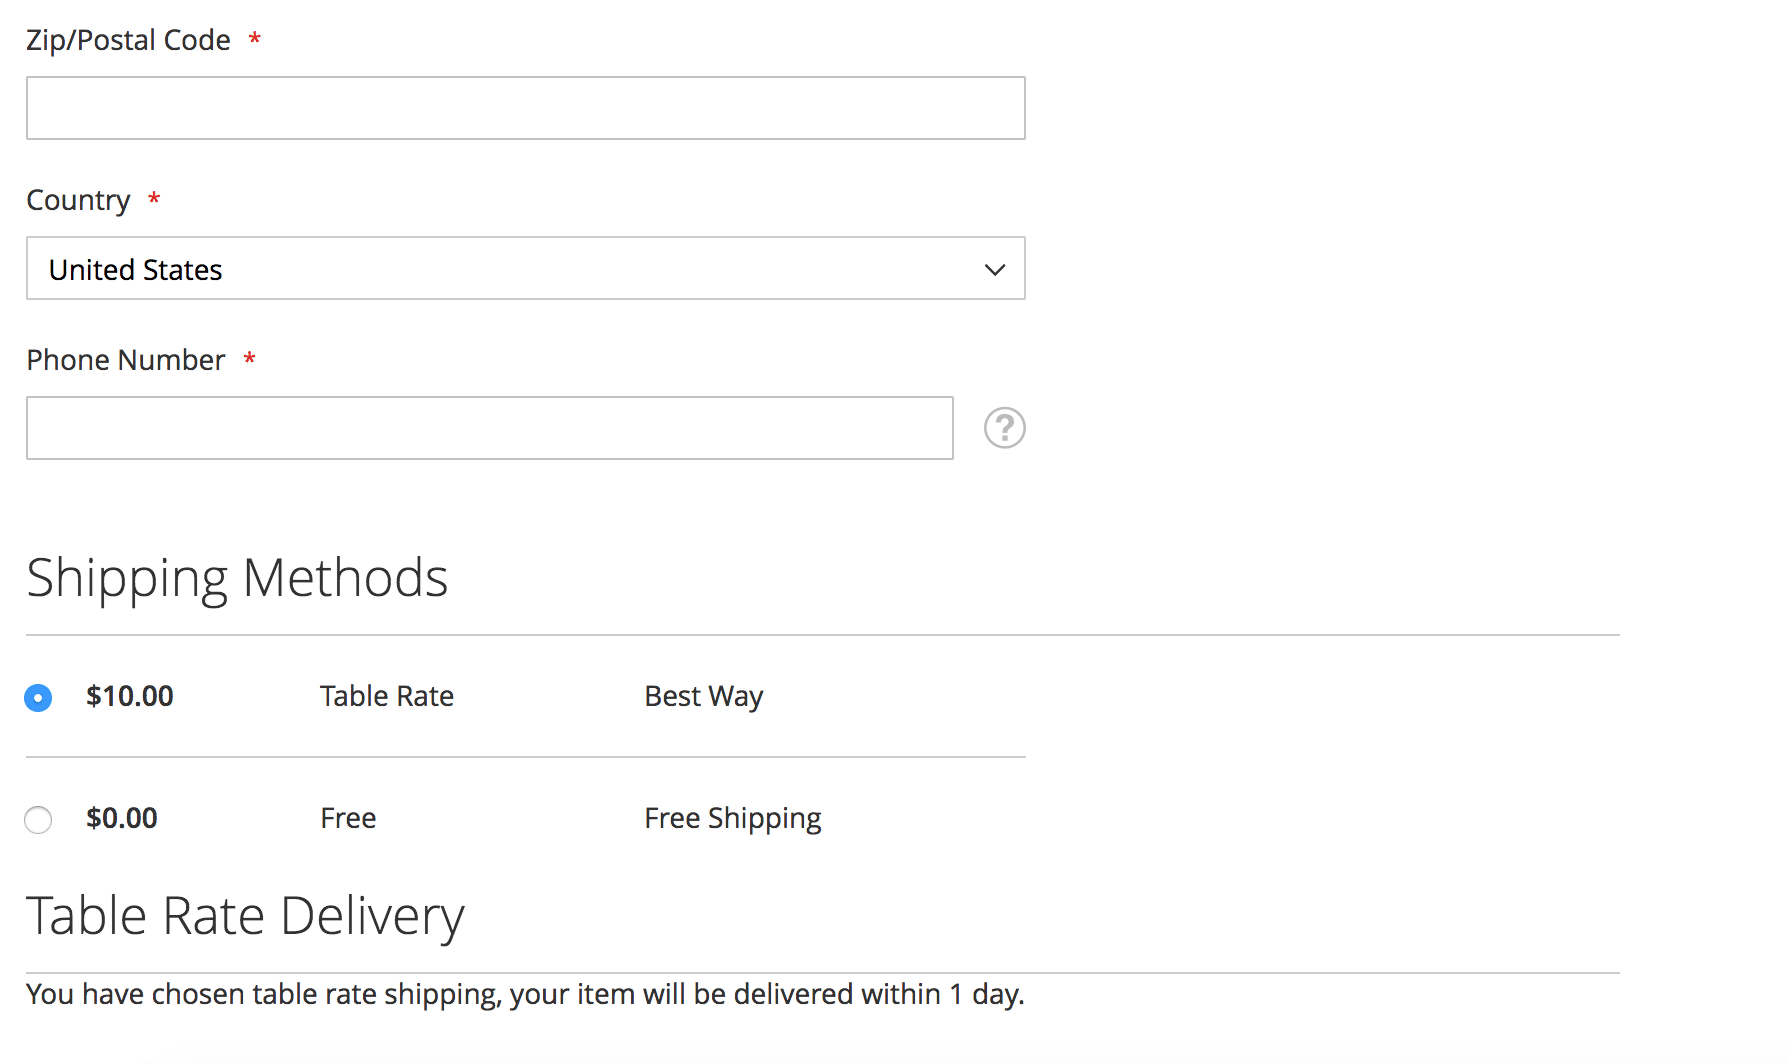
For the needs of this exercise, I will show free shipping information when free shipping method is chosen and another info for table rate shipping method.
<div class="free-shipping-info" data-bind="visible: showFreeShippingInfo()" style="display: none;">
    <div class="step-title" data-role="title" data-bind="i18n: 'Free Shipping Information'"></div>
    <p class="desc" data-bind="i18n: 'Free shipping can take up to 2 weeks.'"></p>
</div>
<div class="table-rate-shipping-info" data-bind="visible: showTableRateShippingInfo()" style="display: none;">
    <div class="step-title" data-role="title" data-bind="i18n: 'Table Rate Delivery'"></div>
    <p class="desc" data-bind="i18n: 'You have chosen table rate shipping, your item will be delivered within 1 day.'"></p>
</div>
Your HTML structure doesn’t need to be exactly as above. The important part is to add certain methods which we will use in javascript to show certain blocks. I have bolded these parts showFreeShippingInfo() and showTableRateShippingInfo(). We are also adding style=”display: none; since initially we don’t want to show these blocks. Feel free to change rest of the code.
Layout
At this point we will extend checkout_index_index.xml so we can add additional block below shipping methods.
checkout_index_index.ml
If you are using module, you need to add file into following path vendor/vendor-name/module-name/view/frontend/layout/ or for theme vendor/vendor-name/theme-name/Magento_Checkout/layout/ where “vendor-name“ and “theme-name” needs to be replaced with your name of vendor and theme. Again, notice, we are using Magento_Checkout module since changes will be made in this specific section.
<?xml version="1.0"?>
<page layout="1column" xmlns:xsi="http://www.w3.org/2001/XMLSchema-instance"
      xsi:noNamespaceSchemaLocation="urn:magento:framework:View/Layout/etc/page_configuration.xsd">
    <body>
        <referenceBlock name="checkout.root">
            <arguments>
                <argument name="jsLayout" xsi:type="array">
                    <item name="components" xsi:type="array">
                        <item name="checkout" xsi:type="array">
                            <item name="children" xsi:type="array">
                                <item name="steps" xsi:type="array">
                                    <item name="children" xsi:type="array">
                                        <item name="shipping-step" xsi:type="array">
                                            <item name="children" xsi:type="array">
                                                <item name="shippingAddress" xsi:type="array">
                                                    <item name="children" xsi:type="array">
                                                        <item name="shippingAdditional" xsi:type="array">
                                                            <item name="component" xsi:type="string">uiComponent</item>
                                                            <item name="displayArea" xsi:type="string">shippingAdditional</item>
                                                            <item name="children" xsi:type="array">
                                                                <item name="shipping-info-wrapper" xsi:type="array">
                                                                    <item name="component" xsi:type="string">Magento_Checkout/js/view/shipping-info</item>
                                                                    <item name="provider" xsi:type="string">checkoutProvider</item>
                                                                    <item name="sortOrder" xsi:type="string">0</item>
                                                                </item>
                                                            </item>
                                                        </item>
                                                    </item>
                                                </item>
                                            </item>
                                        </item>
                                    </item>
                                </item>
                            </item>
                        </item>
                    </item>
                </argument>
            </arguments>
        </referenceBlock>
    </body>
</page>
At this point we specify displayArea into shippingAddtional as mentioned before and specify path for js file which we will create below. Notice, we skip middle part view/frontend/web/ since Magento automatically will recognise this part of the path. If you are using module, replace Magento_Checkout with name of your module.
Javascript
The last file will be shipping-info.js which we declared in xml file. Remember, the name of the file should be the same as added into checkout_index_index.xml.
shipping-info.js
If you are using module, you need to add file into following path vendor/vendor-name/module-name/view/frontend/web/js/view/ or for theme vendor/vendor-name/theme-name/Magento_Checkout/web/js/view/ where “vendor-name“ and “theme-name” needs to be replaced with your name of vendor and theme. Notice, in js folder I have created view folder, it is not necessary, you could place file directly under js directory however since this file helps us with the view of the functionality, I have created this additional folder to make it clear for future development.
;define([
    'uiComponent',
    'ko',
    'Magento_Checkout/js/model/quote'

], function (Component, ko, quote) {
    'use strict';

    return Component.extend({
        defaults: {
            template: 'Magento_Checkout/shipping-info'
        },

        initObservable: function () {
            var self = this._super();
            this.showFreeShippingInfo = ko.computed(function() {
                var method = quote.shippingMethod();

                if(method && method['carrier_code'] !== undefined) {
                    if(method['carrier_code'] === 'freeshipping') {
                        return true;
                    }
                }

                return false;

            }, this);

            this.showTableRateShippingInfo = ko.computed(function() {
                var method = quote.shippingMethod();

                if(method && method['carrier_code'] !== undefined) {
                    if(method['carrier_code'] === 'tablerate') {
                        return true;
                    }
                }

                return false;

            }, this);

            return this;
        }
    });
});
Let’s analyse this code to understand what each part means. I really often struggle to understand which part of the code or names I can change for my custom ones and which I need to keep as an example, all of it I will try to explain right now.
'uiComponent',
'ko',
'Magento_Checkout/js/model/quote'
We need to add references to a couple of functions and components to be able to use in our custom code. For example, quote will help us to define selected shipping method.
Component, ko, quote
This part includes aliases to the mentioned above references, you can use here any other names, but in this specific order.
defaults: {
   template: 'Magento_Checkout/shipping-info'
},
It is a part where we decide path to our html file. Notice, we skip middle part, so we just add name of the module and name of the file. If you are using module, replace Magento_Checkout with the name of your module.
initObservable
This method allows you to declare observable variables within the same instance. You can read more about it in Magento 2 documentation – commonly used uiElement methods.
this.showFreeShippingInfo = ko.computed(function() {
    var method = quote.shippingMethod();

    if(method && method['carrier_code'] !== undefined) {
        if(method['carrier_code'] === 'freeshipping') {
            return true;
        }
    }

    return false;

}, this);
The bolded part is the name of the method which we are using in html file to show or hide certain text. Make sure it is the same name as used in html file.
if(method && method['carrier_code'] !== undefined) {
    if(method['carrier_code'] === 'freeshipping') {
        return true;
    }
}

return false;
At this part we check if any shipping methods is selected and if it is free shipping, if so, we return true to show certain part. In other case, we return false to not showing the block. The same apply for another shipping method. At this point you can freely play with these conditions, show or hide blocks based on your own preferences.
Results
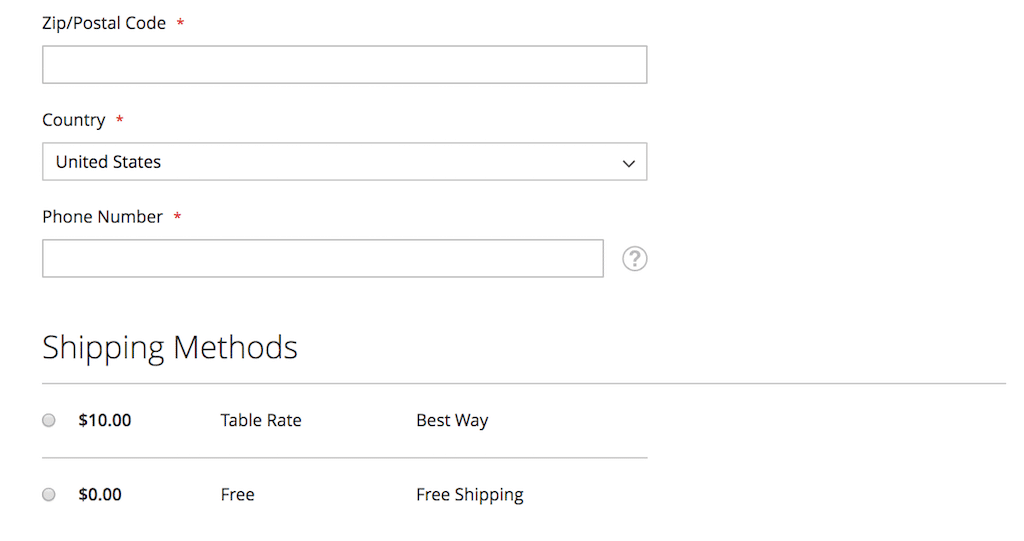
I took for you some screenshots of our implementations based on the Luma theme. I have not added any styling so this is how it will be displayed by default. As you can see I have displayed additional text based on selected shipping method in the checkout in my Magento 2 project.
Not selected shipping methods
Free shipping method selected
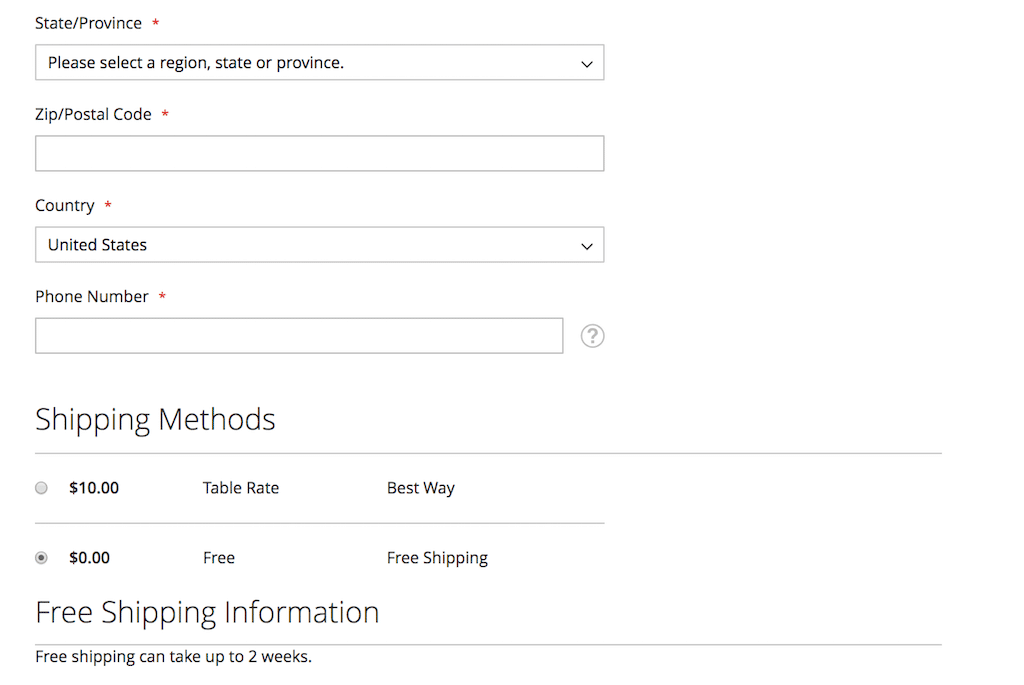
Table rate shipping method selected
MORE MAGENTO 2 TUTORIALS

JOIN THE GROUP ON FACEBOOK!

JOIN ME ON INSTAGRAM!
View this post on Instagram
View this post on Instagram
PIN ME!

I hope it can help with your journey with M2! Also, feel free to give your feedback and advice. In case I made a mistake, let me know! I am only human being 
Did you find this post useful? I would be more than happy if you share it with your friends, maybe someone else will find it useful as well. Good luck!
Zaneta loves challenges so deciding about career path she has chosen typical male industry. Woman who codes. Every 1-2 years she lives in different part of the world. Gym dates is something what she specialised in. Healthy lifestyle, extreme sports and motorbikes have stolen her hear years ago.

1 Comment
This worked like a charm. Thank you!
Thanks!! is this applicable to a custom shipping module?