- How To In Magento 2 – How To Start?
- How To In Magento 2 – How To Add Custom Icons?
- How To In Magento 2 – How To Add Modal PopUp?
- How To In Magento 2 – How To Move Checkout Buttons To Order Summary Only On Desktop
- How To In Magento 2 – How To Recognise Shipping And Payment Step In Checkout On Frontend
- How To In Magento 2 – How To Display Shipping Details On Shipping Step In Checkout
- How To In Magento 2 – How To Display Total Price Summary On Shipping Step In Checkout
- How To In Magento 2 – How To Add Tabs (Accordion) Only On Mobile
- How To In Magento 2 – How To Display Additional Text Based On Selected Shipping Methods In The Checkout
- How To In Magento 2 – How To Add Additional Dropdown With Options Based On Selected Shipping Methods In The Checkout
Today, I would like to talk about modal popup. Magento 2 has a great built in possibility to easily add a popup to any place on your page. Let me quickly go through all the necessary files. I will provide you with two examples from my real tasks as it is really likely you will have similar tasks to implement.
First of all, I would like to encourage you to check out the Modal Widgets Magento 2 Documentation first. Then I am happy to share with you all the necessary code that you will need to add to your project. I will provide you with two examples and I will focus on a case where we will add modal popup which opens after clicking a link in Magento 2 project. If you need any help, book with me 1hr Magento 2 Frontend consultation or learn more about starting work with Magento 2!
Contents
How to add modal popup to standard Magento 2 parts?
Let’s start with a case where we will add a link into the footer in order to add modal popup in our Magento 2 project after clicking the link.
SUBSCRIBE TO MAGENTO 2 NEWSLETTER!
Would you like to get information when new Magento tutorial is available?
Subscribe to the newsletter and be up to date!
Template
First of all, let’s add the necessary templates to our module or theme. They will be located in vendor/vendor-name/module-name/view/frontend/templates/ or vendor/vendor-name/theme-name/module-name/templates/ where “vendor-name“, “theme-name” and “module-name” needs to be replaced with your name of vendor, theme and module name. If you are not creating a new module, you can use Magento_Theme module for this case.
In our example, we will create two phtml files. One file will be to display a link, another file will be to hold a static block. The content of our popup will be added into the static block, but you can also add it directly to the template. Theoretically we could create just one phtml file with the link and popup content, however I look at the problem from a bigger perspective. Maybe at some point we will want to open the popup automatically without clicking the link, or open the popup by clicking another link on the page. In order to make it more general I will create two phtml files.
note.phtml
First of all we need to add a template with our link. Let’s create note.phtml file in your theme or module as mentioned above. If you are wondering how to add it, check out How To In Magento 2 – How To Start?
Solution 1
<div class="note">
   <a class="action popup-open" href="#">
       <span><?php echo __('Please, click to open popup') ?></span>
   </a>
</div>
<?php echo $this->getChildHtml('popup') ?>
<script type="text/x-magento-init">
{
   ".popup-open": {
       "Vendor_ModuleName/js/popup": {}
   }
}
</script>
Let’s focus for a while on each part of this code.
<div class="note">
   <a class="action popup-open" href="#">
    <span><?php echo __('Please, click to open popup') ?></span>
   </a>
</div><?php echo $this->getChildHtml('popup') ?><script type="text/x-magento-init">
{
".popup-open": {
"VendorName_ModuleName/js/popup": {}
}
}
</script>In this part we execute our script. Notice, we use the class of the link “popup-open” and we point to the js file with the name of “popup.js” in the path “VendorName_ModuleName/js”, of course, you need to replace “VendorName” and “ModuleName” with your custom names.
Solution 2
<div class="note">
   <a class="action popup-open" data-mage-init='{"VendorName_ModuleName/js/popup":{}}' href="#">
     <span><?php echo __('Please, click to open popup') ?></span>
   </a>
</div>
<?php echo $this->getChildHtml('popup') ?>
In the Solution 2 we use a different way of initialising the script.
<a class="action popup-open" data-mage-init='{"VendorName_ModuleName/js/popup":{}}' href="#">
   <span><?php echo __('Please, click to open popup') ?></span>
</a>
As you can see we don’t have a <script> tag anymore, instead we have data-mage-init='{"VendorName_ModuleName/js/popup":{}}' where you need to replace “VendorName” and “ModuleName” with your custom names.
What is the different between these two solutions?
In Solution 1 the script will be initialised on all elements with class “popup-open” where in the Solution 2 it will be initialised only on this element.
popup.phtml
At this point I am adding an additional template to point to the static block. Why have I added another template instead of executing the static block directly? I already explained at the beginning of this post.
<div id="popup" style="display: none;">
   <?php echo $this->getChildHtml('popup-content') ?>
</div>
In this case, “popup” is the id of the block that I will use later on and “popup-content” is the static block name that I will set in my xml file later on.
Layout
Our xml files will be added to vendor/vendor-name/module-name/view/frontend/layout/ or vendor/vendor-name/theme-name/module-name/layout/ where “vendor-name“, “theme-name” and “module-name” needs to be replaced with your name of vendor, theme and module name. If you are not creating a new module, you can use Magento_Theme module for this case.
default.xml
As we are adding the link to the footer, I will use default.xml file to add my templates, however feel free to add it to any place on the page as I mentioned earlier.
<?xml version="1.0"?>
<page xmlns:xsi="http://www.w3.org/2001/XMLSchema-instance" xsi:noNamespaceSchemaLocation="urn:magento:framework:View/Layout/etc/page_configuration.xsd">
    <body>
        <referenceContainer name="footer">
            <block class="Magento\Framework\View\Element\Template" name="note-popup" as="note-popup" template="VendorName_ModuleName::note.phtml" after="-">
                <block class="Magento\Framework\View\Element\Template" name="popup" as="popup" template="VendorName_ModuleName::popup.phtml" after="-">
                    <block class="Magento\Cms\Block\Block" name="popup-content">
                        <arguments>
                            <argument name="block_id" xsi:type="string">popup-content</argument>
                        </arguments>
                    </block>
                </block>
            </block>
        </referenceContainer>
    </body>
</page>Javascript
Our last step will be to add a javascript file to our script. Our js file will be added to vendor/vendor-name/module-name/view/frontend/web/js/ or vendor/vendor-name/theme-name/module-name/web/js/ where “vendor-name“, “theme-name” and “module-name” needs to be replaced with your name of vendor, theme and module name. If you are not creating a new module, you can use Magento_Theme module for this case.
popup.js
Let’s create a popup.js file where we will write code with our popup script.
;define(
   [
     'jquery',
     'Magento_Ui/js/modal/modal'
   ],
   function($) {
      "use strict";
      //creating jquery widget
      $.widget('VendorName.Popup', {
         options: {
            modalForm: '#popup',
            modalButton: '.popup-open'
         },
         _create: function() {
             this.options.modalOption = this.getModalOptions();
             this._bind();
         },
         getModalOptions: function() {
             /** * Modal options */
             var options = {
               type: 'popup',
               responsive: true,
               clickableOverlay: false,
               title: $.mage.__('PopUp'),
               modalClass: 'popup',
               buttons: [{
                  text: $.mage.__('Yes, I got you!'),
                  class: '',
                  click: function () {
                     this.closeModal();
                  }
               }]
             };
             return options;
         },
          _bind: function(){
             var modalOption = this.options.modalOption;
             var modalForm = this.options.modalForm;
             $(document).on('click', this.options.modalButton, function(){
                $(modalForm).modal(modalOption);
                $(modalForm).trigger('openModal');
             });
          }
      });

      return $.VendorName.Popup;
   }
);
Notice that in the script I use “popup” id of the popup content which is added to popup.phtml file and I use “popup-open” which is the class of the link in link.phtml file. Moreover, remember to replace “VendorName” with your own custom name.
Result
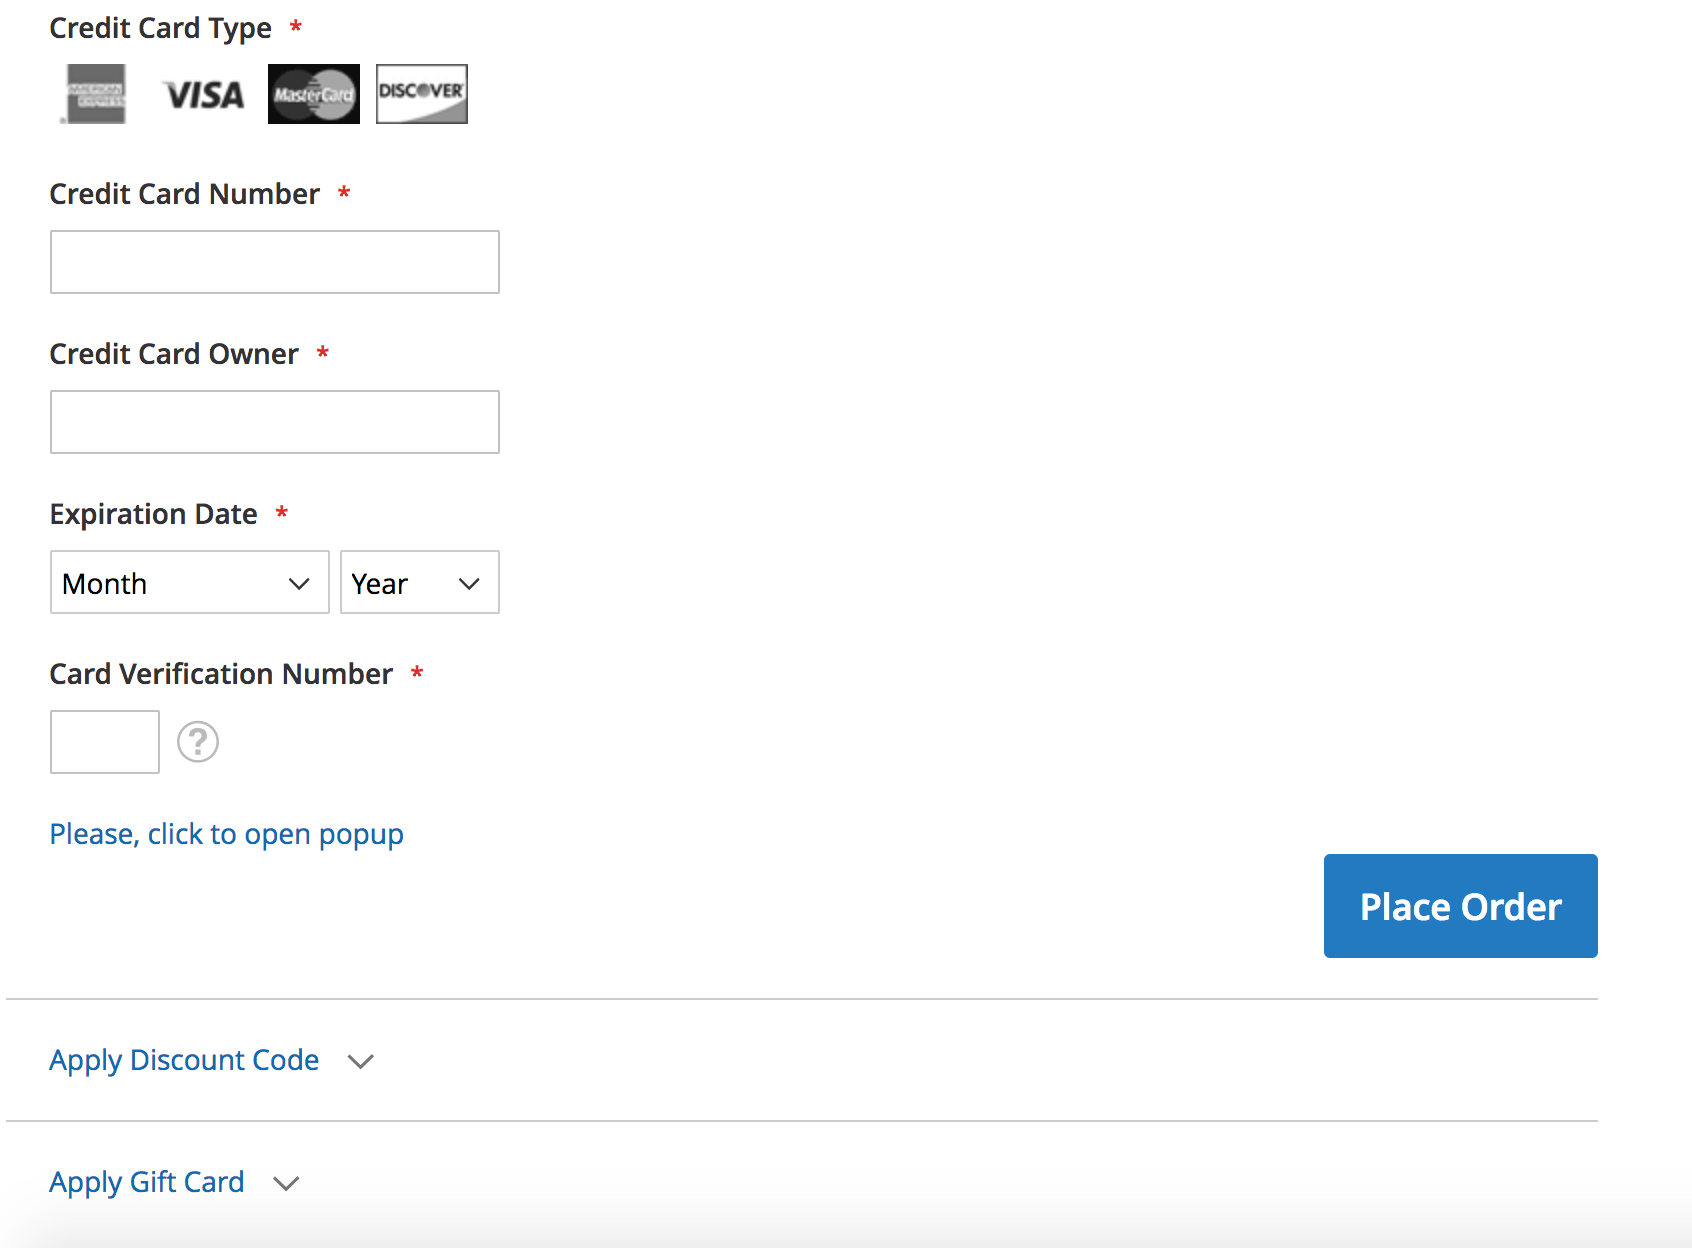
I took for you screenshots of our implementation based on the Luma theme. I have not added any styling so this is how it will be displayed by default. As you can see, I have added modal popup after clicking the link in the footer in Magento 2 project.
How to add modal popup to knockout.js part in Magento 2?
Let’s focus on the example where you need to add a link just before the Place Order button and add modal popup to the checkout in Magento 2. As you should know, checkout uses knockout.js and the implementation is slightly different here.
Template
In this case we will keep our popup.phtml file from the previous example, we will just add it in in a slightly different way into the xml file. However, before you continue, make sure you have added popup.phtml as mentioned above.
Our second file will be located in a different place, which is vendor/vendor-name/module-name/view/frontend/web/template/ or vendor/vendor-name/theme-name/module-name/web/template/ where “vendor-name“, “theme-name” and “module-name” needs to be replaced with your name of vendor, theme and module name. If you are not creating a new module, you can use Magento_Checkout module for this case as we make the implementation into the checkout part.
note.html
Another file mentioned above will be note.html which has a similar structure to note.phtml.
<div class="note">
    <a class="action popup-open"data-bind="mageInit: {'VendorName_ModuleName/js/popup':{}}" href="#">
        <span><!-- ko i18n: 'Please, click to open popup.'--><!-- /ko --></span>
    </a>
</div>
Again, we use the class of the link “popup-open“. I also initialised our script by data-bind calling our script popup.js, really similar to Solution 2 in the previous example.
Layout
Our xml file, as in the previous example, will be added to vendor/vendor-name/module-name/view/frontend/layout/ or vendor/vendor-name/theme-name/module-name/layout/ where “vendor-name“, “theme-name” and “module-name” needs to be replaced with your name of vendor, theme and module name. If you are not creating a new module, you can use Magento_Checkout module for this case as we make the implementation into the checkout part.
checkout_index_index.xml
In this case, we will use checkout_index_index.xml as we will focus on adding a popup to the checkout. If you are familiar with this file, you know that it is slightly different than the rest of the xml files.
<?xml version="1.0"?>
<page xmlns:xsi="http://www.w3.org/2001/XMLSchema-instance" layout="1column" xsi:noNamespaceSchemaLocation="urn:magento:framework:View/Layout/etc/page_configuration.xsd">
    <body>
        <referenceBlock name="checkout.root">
            <arguments>
                <argument name="jsLayout" xsi:type="array">
                    <item name="components" xsi:type="array">
                        <item name="checkout" xsi:type="array">
                            <item name="children" xsi:type="array">
                                <item name="steps" xsi:type="array">
                                    <item name="children" xsi:type="array">
                                        <item name="billing-step" xsi:type="array">
                                            <item name="children" xsi:type="array">
                                                <item name="payment" xsi:type="array">
                                                    <item name="children" xsi:type="array">
                                                        <item name="payments-list" xsi:type="array">
                                                            <item name="children" xsi:type="array">
                                                                <item name="order-comment" xsi:type="array">
                                                                    <item name="component" xsi:type="string">VendorName_ModuleName/js/checkout-popup-note</item>
                                                                    <item name="displayArea" xsi:type="string">before-place-order</item>
                                                                    <item name="dataScope" xsi:type="string">checkoutpopup</item>
                                                                    <item name="provider" xsi:type="string">checkoutProvider</item>
                                                                </item>
                                                            </item>
                                                        </item>
                                                    </item>
                                                </item>
                                            </item>
                                        </item>
                                    </item>
                                </item>
                            </item>
                        </item>
                    </item>
                </argument>
            </arguments>
        </referenceBlock>
         <referenceContainer name="footer">
            <block class="Magento\Framework\View\Element\Template" name="popup" as="popup" template="VendorName_ModuleName::popup.phtml" after="-">
                <block class="Magento\Cms\Block\Block" name="popup-content">
                    <arguments>
                        <argument name="block_id" xsi:type="string">popup-content</argument>
                    </arguments>
                </block>
            </block>
        </referenceContainer>
    </body>
</page>Javascript
In this case, we will keep popup.js from the previous example. Before continuing, make sure you have this file as described in the first example.
Our second js file that is needed to add the note.html file to the checkout will be added to vendor/vendor-name/module-name/view/frontend/web/js/ or vendor/vendor-name/theme-name/module-name/web/js/ where “vendor-name“, “theme-name” and “module-name” needs to be replaced with your name of vendor, theme and module name. If you are not creating a new module, you can use Magento_Checkout module for this case as we make the implementation into the checkout part.
checkout-popup-note.js
;define(
    [
        'ko',
        'jquery',
        'uiComponent'
    ],
    function (ko, $, Component) {
        'use strict';
        return Component.extend({
            defaults: {
                template: 'VendorName_ModuleName/note'
            }
        });
    }
);
In this case, we just add the note.html file.
Result
I took for you, screenshots of our implementation based on the Luma theme. I have not added any styling so this is how it will be displayed by default. As you can see I have added modal popup which opens after clicking link in the checkout of Magento 2.
MORE MAGENTO 2 TUTORIALS
JOIN THE GROUP ON FACEBOOK!
JOIN ME ON INSTAGRAM!
View this post on Instagram
View this post on Instagram
PIN ME!
I hope it can help with your journey with M2! Also feel free to give your feedback and advices. In case I made a mistake, let me know! I am only human being ?
Did you find this post useful? I would be more than happy if you share it with your friends, maybe someone else will find it useful as well. Good luck!
Editor – Natasha Jay O’Neil, please contact Natasha directly for queries related to her services.
Zaneta loves challenges so deciding about career path she has chosen typical male industry. Woman who codes. Every 1-2 years she lives in different part of the world. Gym dates is something what she specialised in. Healthy lifestyle, extreme sports and motorbikes have stolen her hear years ago.







17 Comments
very good tutorial. thanks!
Thank you so much! Really appreciate that you took time to give me feedback!
Great work Zaneta!
Thank you for this tutorial.
Thank you for taking time to add this comment, really appreciate it!
default.xml does not work.
It’s missing spaces.
Thank you for taking your time to comment. I will check it out and fix it if necessary 🙂
Thank you for the simple and useful tutorial. Was really looking for such tutorials for my students.
Thank you so much for taking time and commenting. It is always good to know that I create something useful for others.
Thanks for your kind explanation
I have one question. How can I add popup content?
Now your example only show popup close button.
I want to add some text or image in popup modal
Im looking forward to talk to you soon.
Regards
getChildHtml(‘popup-content’) ?> it is where I call static block with the content. My static block has id ‘popup-content’. I hope it helps.
Hi Zaneta,
I am a magento beginner. It feels great to read your article and it is very helpful to me. According to your article, I tried to write a module about modal: Click the PLP product add to cart button to pop up the modal box before adding to cart. My method didn’t stop the add to cart action. This problem has been bothering me and I don’t know how to fix it. could you help me?
how can i load the popup on dom ready instead of a on click event?
Mam how can I add a popup on homepage without clicking any button.
I am Viet Nam. it has a difficult to read,Can you show the code on github?
I was living in Vietnam 3 months and working with Vietnamese developers, good memories 🙂 Unfortunately I don’t have this code on the github.
hi and thank you so much for this tutorial ! it is very helpful. if i want to use magento modal i dont need to insert note.phtml file?
I have some more help, how to home page popup, cookie policy also